Dual booting lets you run both Linux and Windows on the same computer, choosing which one to start when you turn on your machine. It is the ideal solution if you want to explore Linux while keeping full access to your existing Windows installation, files and programs.
This guide covers the entire process from preparation to first boot, including how to handle the tricky parts safely.
What you need before starting
Before touching anything on your computer, make sure you have:
- A Windows computer with at least 50GB of free disk space (ideally 100GB+)
- A USB drive with at least 8GB of capacity
- An internet connection to download the Linux ISO
- A backup of all important files (non-negotiable — see the next section)
- About 60-90 minutes of uninterrupted time
You should also know your computer’s BIOS/UEFI key — the key you press during startup to access firmware settings. Common keys are F2, F10, F12, and Delete. Check your computer’s manual or search online for your specific model.
Back up your data first — seriously
This is not a formality. Disk partitioning — shrinking Windows to make space for Linux — involves modifying the partition table on your hard drive. While modern tools do this safely the vast majority of the time, any unexpected event (power cut, hardware failure, software bug) during this step can corrupt your data.
The backup process is simple:
- Connect an external hard drive or large USB drive
- In Windows, open File Explorer and copy your important folders (Documents, Downloads, Pictures, Music, Videos, Desktop) to the external drive
- If you use cloud storage (OneDrive, Google Drive), verify your files are actually synced and accessible from the web
Once your backup is confirmed, you can proceed with confidence. If something goes wrong, you can restore everything. For a realistic picture of what life on Linux actually looks like after switching from Windows, read Alex’s story of switching from Windows to Linux — his honest account of what was easy, what was hard, and whether he’d do it again.
Disable Fast Startup and Secure Boot in Windows
Two Windows features can interfere with Linux dual boot and should be disabled before proceeding.
Fast Startup is a Windows feature that saves a partial hibernation state when you shut down, allowing Windows to start faster. Unfortunately, this can cause problems when sharing a disk between Windows and Linux. To disable it:
- Open Control Panel > Power Options
- Click “Choose what the power buttons do”
- Click “Change settings that are currently unavailable”
- Uncheck “Turn on fast startup (recommended)”
- Click “Save changes”
Secure Boot is a UEFI feature that prevents unauthorized software from loading at boot time. While some Linux distributions support Secure Boot, disabling it avoids compatibility issues. You disable it in UEFI/BIOS settings — accessed by pressing F2, F10, or Delete during startup (before Windows loads). Look for a “Secure Boot” setting in the Security or Boot tab and set it to Disabled.
Save and exit BIOS. Windows will boot normally.
Shrink your Windows partition
You need to create empty, unallocated space on your hard drive where Linux will be installed. The easiest way to do this is using Windows Disk Management.
- Press Windows key + X and click “Disk Management”
- Right-click on your main Windows partition (usually labeled C:, typically the largest partition)
- Select “Shrink Volume”
- In the “Enter the amount of space to shrink in MB” field, enter how much space you want to give Linux. For 50GB of Linux space, enter 51200 (50 × 1024). For 100GB, enter 102400.
- Click “Shrink”
After a moment, you will see a new block of black unallocated space on your drive. This is where Linux will be installed. Do not format this space or create a new partition — leave it as unallocated. The Linux installer will handle it.
What if Windows can’t shrink enough? Windows may be unable to shrink by the amount you want because some system files are stored near the end of the partition. Running Disk Cleanup and disabling the page file temporarily can help free space for shrinking. Alternatively, you can use a third-party partition tool like GParted (available on a Linux live USB).
Create a bootable Linux USB drive
Download the ISO for your chosen Linux distribution. Ubuntu is recommended for dual booting because its installer explicitly supports the “Install alongside Windows” option. Our guide on which Linux distribution to choose can help you decide.
On Windows, use Rufus (rufus.ie) to write the ISO to your USB drive:
- Plug in your USB drive
- Open Rufus — it detects your USB drive automatically
- Under “Boot selection”, click “SELECT” and choose your Linux ISO
- Set “Partition scheme” to GPT (matches modern UEFI systems)
- Click “START” and confirm when warned the drive will be erased
- Wait for the process to complete
Safely eject the USB drive when done.
Install Linux alongside Windows
Restart your computer and boot from the USB drive using the boot menu (F12 on most systems — see your motherboard manual for the correct key).
When the Linux installer loads, proceed through the initial screens (language, keyboard, internet connection). When you reach the “Installation type” screen, you will see an option labeled:
“Install Ubuntu alongside Windows Boot Manager” (or similar wording depending on your distribution)
Select this option. The installer detects your existing Windows partition and the unallocated space you created, then presents a slider showing how to divide the space between the two systems.
Adjust the slider if you want to change the allocation, then click “Install Now”. Confirm the changes when prompted. The installer will then partition the disk and proceed with installation.
Complete the remaining steps: select your timezone, create your username and password, and wait for installation to finish (10-20 minutes).
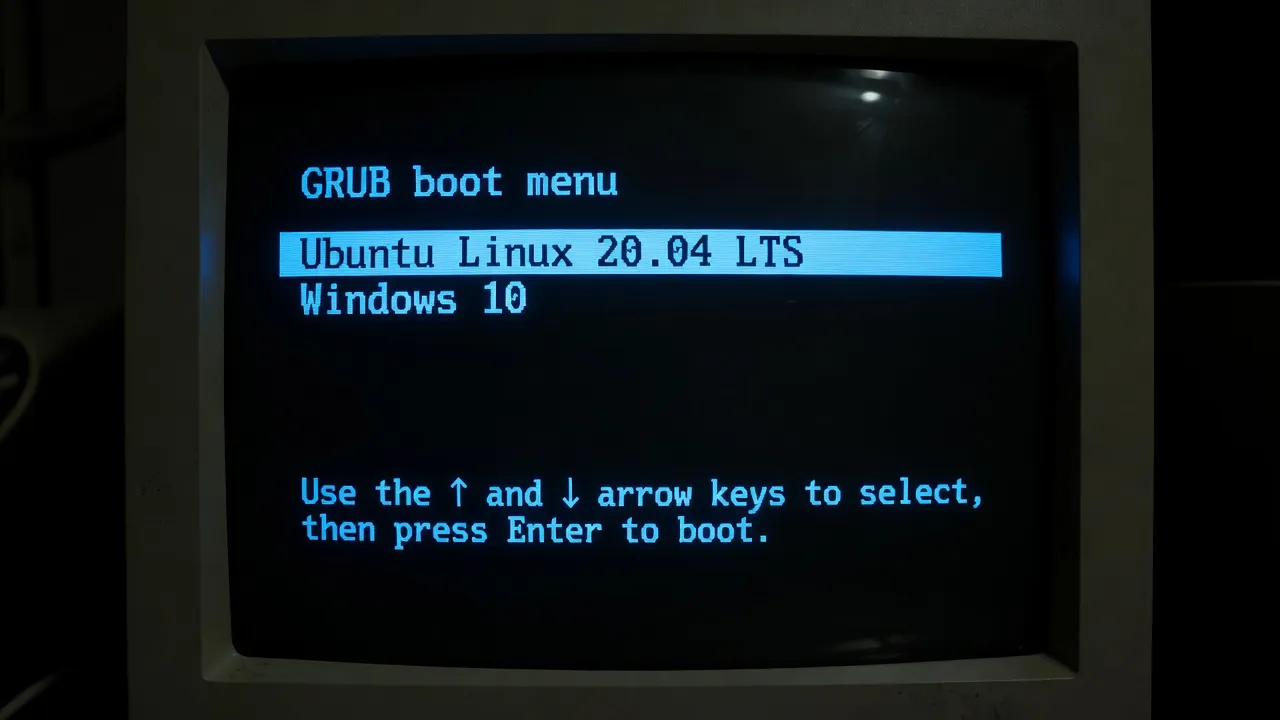
When installation completes and your computer restarts, you should see the GRUB boot menu.
Understanding the GRUB boot menu
GRUB (Grand Unified Bootloader) is the software that appears when your computer starts in a dual boot configuration. It presents a simple text menu with options like:
- Ubuntu (or your Linux distribution)
- Advanced options for Ubuntu
- Windows Boot Manager
Use the arrow keys to select your desired operating system and press Enter. If you do nothing for a few seconds, GRUB automatically boots the default choice (usually Linux).
GRUB is installed to the same disk as your operating systems and is managed by Linux. It understands how to boot both Linux and Windows correctly.
Choosing your default OS at startup
By default, GRUB waits 10 seconds and boots Linux if you do not make a selection. You can change both the default operating system and the timeout period.
On Ubuntu, the easiest way is with the GRUB Customizer application:
sudo add-apt-repository ppa:danielrichter2007/grub-customizer
sudo apt update
sudo apt install grub-customizer
Launch GRUB Customizer from your applications menu. You can drag items to reorder them (the top item is the default), change the boot timeout, and adjust the visual appearance.
Alternatively, you can edit the GRUB configuration directly:
sudo nano /etc/default/grubChange GRUB_DEFAULT=0 to the position of your preferred OS in the menu (0 = first item, 1 = second item, etc.). Change GRUB_TIMEOUT=10 to your preferred wait time in seconds. Save the file and run:
sudo update-grubTroubleshooting common dual boot problems
GRUB not appearing — boots straight to Windows: This sometimes happens on systems where Windows is very dominant in the boot order. Enter UEFI/BIOS settings and look for the boot order. Move your Linux disk or “GRUB” entry to the top of the boot order.
GRUB disappeared after a Windows update: Major Windows updates sometimes overwrite the GRUB bootloader. Fix it by booting from your Linux USB, selecting “Try Ubuntu”, and running boot-repair:
sudo add-apt-repository ppa:yannubuntu/boot-repair
sudo apt update
sudo apt install boot-repair
boot-repair
Select “Recommended repair” and let it run. Reboot and GRUB should be restored.
Windows clock shows wrong time: Linux and Windows handle the hardware clock differently by default. This can cause the clock to show the wrong time in Windows after using Linux. Fix it in Linux:
sudo timedatectl set-local-rtc 1 --adjust-system-clockCan’t boot Linux — says “no such device”: This usually indicates GRUB lost track of your Linux partition, often after disk changes. Boot the Linux USB in Try mode and run boot-repair as described above.
Windows partition shows as read-only in Linux: Windows Fast Startup leaves the NTFS partition in a partial hibernation state. Make sure Fast Startup is disabled in Windows (covered earlier in this guide). If the problem persists, from Windows run a proper shutdown (not restart) to fully release the partition.
Dual booting is reliable once set up. Millions of users run this configuration daily without issues. The occasional problem — like GRUB disappearing after a Windows update — has well-documented solutions and takes just a few minutes to fix.